Monday, December 31, 2012

Ode to Theo Chocolate: Fig, Fennel, Hazelnut and Chocolate Fruitcake


Once upon a time, I lived in Seattle, home of Theo Chocolate, the bean-to-bar chocolate factory in the Fremont neighborhood. Theo is the creator of some cheerfully offbeat chocolate bars, including mirepoix caramels and the delicious Coconut Curry chocolate bar.

But, in my mind, nothing competes with their Fig, Fennel and Almond bar. All alone, it is interesting to nibble at. Throw it in the mix at a wine-tasting, however, and this chameleon steals the show. I have never had a piece of chocolate so overtly recreate itself depending on the wine it is paired with. With one red, it tasted dark and bitter; with another it was absolutely jammy and all you could taste was figgy chocolate. Another tasted very grown up and sophisticated - smoked fennel with a tinge of syrupy sweetness. With every sip of a different wine, the same chocolate sang a new song. For that kind of a magic trick, it became my favorite.

At Christmas time in my family, we always make Maranatha Cake... a secret recipe from my Dad and the men on his side of the family. My brother makes it, and I am sure he's been teaching his son to make it as well. I think I am the only woman in the family who makes it as well.
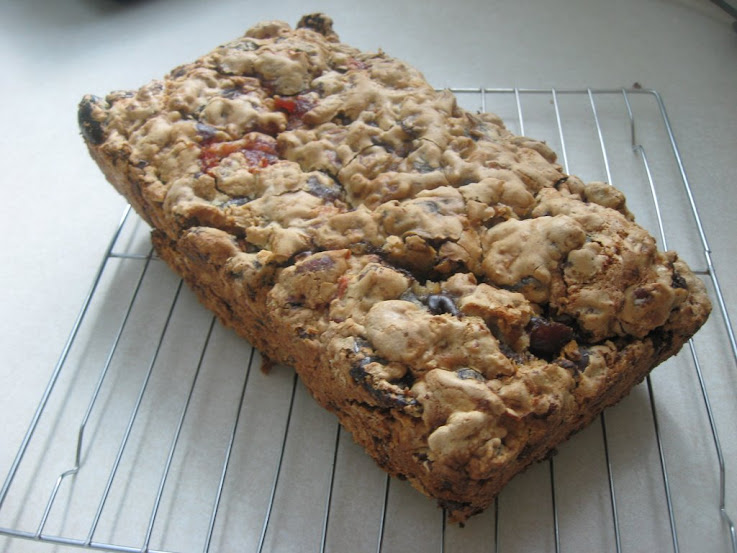
This is one of my brother's photos -- the original cake in full-loaf

Technically, it's a fruit cake. But I hate calling it that, because it is more like a candy bar baked into a loaf form. There is very little "cake" -- just enough to hold the chocolate, fruit and nuts together. It isn't doused in alcohol, it has no citrus or (much worse) citron or green pineapple in it.

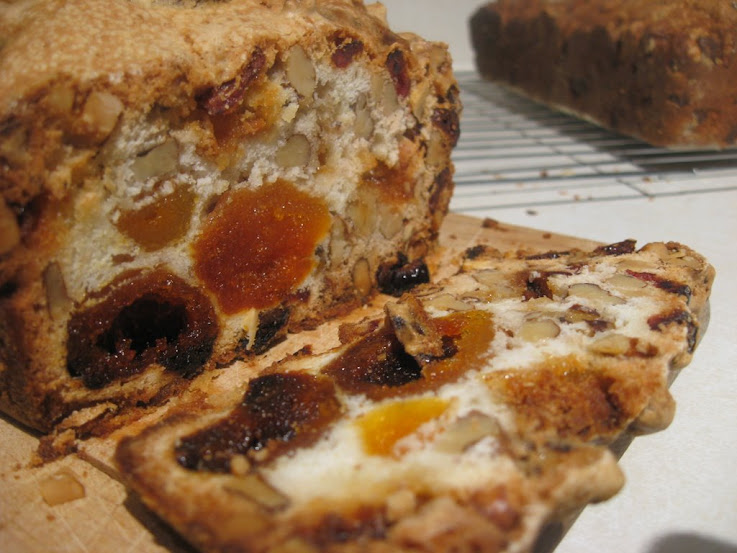
The published variation includes apricots and white chocolate.

The original recipe is a guarded secret, but my father published a variation recipe in a paper several years ago. Since the variation is out there, I figure I am safe to share my variation on our family recipe.

This one is a tribute to Theo's Fig, Fennel & Almond bar.


I attempted this last year with figs, fennel bulb, almonds and semi-sweet chocolate. It was extremely disappointing as I discovered fennel bulb retains little to no flavor once it is cooked/dried out. So I had chocolate fig bars. Dumb.

This year, I wised-up, and got fennel seed. Also, because I really am just tired of almonds, and I have always loved hazelnuts since I was a small child and related emotionally with them as the puny round underdogs amidst big personalities in the mixed nuts bowl... I decided to substitute hazelnuts for almonds.

The results, I think, were incredible. If you don't like any of the dried fruit/nut ingredients, just substitute your own in the same quantity.

Preheat oven to 325.

You'll need 2 bowls, parchment paper, a regular sized loaf pan and a few other regular items.

In a bowl, beat together until pale yellow:
- 3 eggs
- 1 c. sugar

In a separate bowl, sift together:
- 1 1/2 c. flour
- 1 1/2 teaspoons baking powder
- 1/2 teaspoon salt
- 2 Tablespoons fennel seed

Then add to flour mixture:
- 1 bag (usually 11-12 oz) semi-sweet chocolate chips, or about 1.5 cups
- 2 cups dried black figs
- 2 cups raw hazelnuts

Stir the dry ingredients together to make sure all the fruit, chocolate and nuts are separated and coated in the flour mixture. Pour in the egg/sugar mixture, and mix everything until all the flour is absorbed and you have a very chunky batter. Press it all into a no-stick sprayed, parchment paper lined loaf pan. [if you don't use paper to lift the loaf out, you will be sorry!] Bake for 60-75 minutes, or until a toothpick comes out clean or with only melted chocolate (not batter) on it!

Hint: It will make your cake much more moist if you put a pan of water in the oven on a lower rack while you bake the loaf of maranatha cake.

Once it has cooled, lift it out of its pan and wrap in plastic wrap and foil to keep. This will last for a very long time in your fridge and is great to pull out throughout the holidays to slice off a wedge at a time. We cut our about 1/2" to 1" thick, and usually can only handle a half-slice at a time.

Friday, November 30, 2012

Vanilla Bean Marshmallows

(this has a lot to it, so if you just want the recipe, skip down)

Several years ago, I learned to run using a walk-jog 13-week 10K program. As a girl who had always tried to hide in a closet with a book whenever her mother mentioned the word "outside," and who could never sprint further than the distance between two telephone poles... this was nothing short of a miracle to me. I'd accepted and embraced the "unathletic" label, and just assumed that is how it would always be. So to learn to run changed my life. I learned to do something impossible. It was overwhelming and spilled confidence into many other areas of my life ... and I started tackling the impossible everywhere.

I wanted to share this joy and offered to be a running buddy / coach to anyone who wanted to commit to do it. I was loosely friends with D at the time, but she took me up on my offer. While others would pull no-shows and frustrate me, D would show up, day after day, week after week. She also never considered herself athletic and had her own childhood issues with P.E. She had more discipline than I did, and was always on time, ready to meed me. And she DID it. She learned to run. She also tackled the impossible and came out victorious. I was so proud of and happy for her. We continued to jog and walk together every week for years.

In the midst of forming this long, slow-cooker, deeply enjoyable friendship, D showed me how to make marshmallows. I may have been a few steps ahead of D in the running world, but she was a bold explorer into the culinary ... and she was making candy!

Candy has always intimidated me: thermometers, exact timing, burning sugar... I mean, you look away for ten seconds and your caramel sauce turns into jawbreakers. Or something like that.

D took the fear out of candy for me by inviting me to make marshmallows with her. I think the first time we made them, it was Christmas time, like now. She lived near a neighborhood that competed for highest electric bill in December, and their lights and yard decor for Christmas were incredible. So we hatched an idea... to make marshmallows, and put them in spiked hot chocolate for a tromp in the Christmas lighted neighborhood. (Not only was D a seasoned culinary experimenter, she also was an intrepid cocktails-and-liquors explorer... and I owe my love of tequila to her and her husband.)

Needless to say, it was a smash success that we repeated. While what I treasure most is the memory and friendship, I have to say the marshmallows are the crown on the experience.

I moved, and D and I no longer have our weekly walks. I live nowhere nearby to do Christmas and marshmallows.

I did bring the recipe with me, however, and her legacy lives on in my current regime.

These vanilla marshmallows, it turns out, are the Achilles Heel of my husband's perfect healthy eating lifestyle and self-discipline. While he will say 'no thanks' to any dessert or unhealthy food, even if it means not eating for days... he has a weakness for these marshmallows in Mexican Hot Chocolate and specially requests it.

As a sugar addict desperate for company on a sugar-binge, of course I oblige him. I love it.

Cheers to you, D! Thank you for the hundreds of runs and walks over the years. Thank you for chili and jalapeno cornbread, thank you for all the post-walk cocktails, thank you for the olive oil cake, thank you for good talks, thank you for showing me Cake Wrecks and Simon the Cat, and thank you for teaching me to make marshmallows! Merry Christmas to you and your little family! I hope you get to drink lots of hot chocolate and enjoy Christmas lights all through the season.

Stephan's Achilles Heel:

- Ibarra hot chocolate (yellow octagonal box in the Mexican food section usually. "Abuelita" also works great)
- organic nonfat milk (hey, it helps him feel better. If you want to go for whole or 2%, do it!)
- vanilla bean marshmallows (recipe after this)

1. Measure milk in cups (2 c. per person). Pour into a sauce pan on the stove, and put the heat on medium or high.
2. For each cup of milk, use a square of chocolate. So, for Stephan and I, we make 4 c. milk, and put 4 wedges (half a round) of chocolate in the pan.
3. Let it warm up enough that the chocolate gets soft ... and whisk it into the milk.
4. Pull it off the burner when it is as hot as you want it. If you boil it, it will get a skin (no biggie).
5. Add marshmallows!

If you want... spike it. With brandy, or tequila, or bourbon/whiskey, or whatever else you think would be good. I liked it with Tullamore DEW, the whiskey used in Irish Coffees.

Vanilla Bean Marshmallows (adapted from Alton Brown's Food Network recipe)

STOP! You must have a Kitchen Aid and a candy thermometer. If you don't have these, I don't now how you can do it. You miiiight be able to do it with an eggbeater rather than Kitchen Aid. Be prepared, it will be a lot of work if you do.

1 c. light corn syrup
1 c. ice-cold water
3 packages plain gelatin (Jello aisle; Knox makes it and the smallest is a box with 4 packs)
1 1/2 c. regular granulated sugar
1 tsp. kosher salt
1 vanilla bean (if you can't spring for it, 1 tsp. extract)
1/4 c. powdered sugar
1/4 c. corn starch
nonstick spray (no flavor)

1. Put 1/2 c. ice cold water in the Kitchen Aid. Sprinkle the gelatin on top. Leave it to sit.
2. Into a saucepan put the granulated sugar, salt, corn syrup and 1/2 c. water. Turn it on HIGH, and don't stir it. Leave the lid off. Clip the candy thermometer on and make sure you can tell where 240 F is (also labeled "soft ball" for the candy terminology). It will take 7-8 minutes to get there.
3. While you are waiting, mix powdered sugar and cornstarch. This is your "no stick dusting powder" for the marshmallows.
4. Once the sugar syrup hits 240 F, take it off the heat immediately.
5. Turn on the Kitchen Aid (SLOW) and drizzle the hot syrup down the side, slowly incorporating it into the gelatin mixture.
6. Once all the syrup is in, turn the speed up to its highest setting and set your timer for 15 minutes.
7. Cut open and scrape the vanilla bean for its guts and add it to the marshmallow mixture about 5-6 minutes into its timing. If you do it too early, the mixture is so hot it will cook out some of the flavor. If you wait too long, it doesn't mix in very well.
8. While you are waiting, spray a 9x13 cake pan or similar dish (eg casserole, something with some depth) with the nonstick spray, and then dust with the powdered sugar / cornstarch mixture. It's messy...
9. Once the Kitchen Aid beating is done, it should look really amazing - like marshmallow fluff. The bowl should feel warm to the touch, but not hot.
9. Spray a rubber spatula with nonstick spray, and use it to scrape the marshmallow out of the Kitchen Aid bowl into the dish. Smooth the surface as necessary, but it looks good with a rustic, non-even surface, too, so don't stress.
10. Leave the tray uncovered in a dry place where it won't get dust for several hours (depending on how dry it is where you live, this could be faster or slower) -- 4 at least, overnight at longest. Once it has set, it will be one giant marshmallow that you can pull out of the dish in its entirety. a knife with non-stick spray and powdered sugar/cornstarch can be used to cut marshmallow squares at whatever size you prefer. Roll the stick sides in more of the powder.
11. Store in an air-tight container and I think they last forever. Not that they'll last nearly that long.

YUM!


Thursday, November 29, 2012

Orange Slice Ornaments

 
Last year, I stumbled across some instructions on the easiest impatient-person-friendly ornaments ever. And they're so pretty. For my ADD, this project worked GREAT. All you need is citrus and a sharp knife, a baking sheet and an oven.

OK, so there are LOTS of instructions for how to make these out there on the internets/Pinterest, etc. But a lot of them make this more difficult and crafty ("add cinnamon! sprinkle with sugar! sprinkle with glitter!" and a bunch of complicating crap like that). Ignore them and do it the easy way and it's simpler and more elegant in my opinion.

Here's what I remember:

1. slice oranges across the sections (so they look like wheels), into 1/4" to 1/2" rounds. The thinner they are, the clearer they'll be... but you also run the risk of them tearing or getting holes.

2. Place rounds on a cookie sheet and bake at some low temperature for hours until they are dry as toast! (you probably have to turn them once to finish them off). Try 150 degrees for 3-4 hours, see how it works. Just don't turn the oven up too high or it will make them burn and turn dark.

3. THE END. Oh, get some thread and needle, and thread a loop through the orange to make it hang-able on the Christmas tree.

4. Bonus: your house smells amazing while these suckers are in the oven.

Here's my pics from last year:

 (pay no attention to the fennel on the bottom left)
 Plateful of the Martha Stewart worthy ones. Yes, you've already seen this. Yes, I'm proud of myself.
 Reality check: they don't all come out perfect. But I still like these. And if I do it again, I'll use THESE in apple cider mulling spice mix.
 See how clear they can get? Well, the lemon slices got really clear for me.
They look so pretty on the tree. The end!

Wednesday, September 12, 2012

Adventures in Sangria

I tested a lot of white or pink sangrias this summer. I'm sharing photos from my prettiest and unfortunately least-rewarding endeavor*... a Caliente Sangria, with jalepeno to spice things up!

*My mistake was using unripe fruit. 
Everything was sour and hard, not luscious and soft! 
Also, I just don't prefer pepper in my sangria, I guess!

As you can see, white sangria is absolutely gorgeous and showcases the fruit better than a red sangria. I honestly think they taste better and are more refreshing, too. Nothing beats a cold glass of white or pink sangria under a porch umbrella on a hot day!

I also think I've boiled down the basics to put together a GREAT white or pink sangria every time. Here's the formula... you should experiment with one!

1. One bottle of Sauvignon Blanc or Rose. My favorite is, honestly Barefoot. It's delicious. You want something that is fairly dry, and not too expensive.
2. One bottle of champagne, prosecco, or cava -- again not to expensive, but not one you think is disgusting on its own. I actually find most proseccos or cavas are better tasting. Just my experience. You need bubbles.
3. Three kinds of RIPE fruit, 1 cup each. Good ones include: peaches, nectarines, grapes, cherries, apples... think stone fruits and things you often taste hints of in wine. Strawberries and other tender fruits may work, too, but realize they're delicate and will fall apart faster. If you use underripe fruit, your sangria will hardly be flavored at all, and will be forgettable.
4. Two shots of one or two kinds of hard liquor that pairs well. For example, peach schnapps with peaches and nectarines. Pear brandy with apples and lemons. Think what flavors you would like to taste together.
5. Sweetener. If your liquor has sugar in it (like peach schnapps, or limoncello) you may not need any sweetener. If you're using tequila or brandy or something that is not pumped with sugar, you'll need to add a few tablespoons of honey or agave or dissolved sugar.
6. Extra: add an herb if you'd like! Basil, mint, thyme, etc. Get creative!


Assembly:

1. Slice fruit into bite-size chunks, and place in bottom of sangria pitcher. (Add herbs if you're using them.)
2. Pour hard alcohol and sweetener over the fruit. Stir and allow to macerate for at least an hour.
3. Add white wine or rose, but don't stir. Steep 6 hours or overnight, covered.
4. Just before serving, add bubbly.
5. Pour over glasses filled with ice.

DELISHUS!!!


A Friend's Variation on the Emerald City Salad

Here's another way to make the Emerald City Salad I posted about earlier... I just can't get enough of the kale with the lemon dressing!

Watch here!

Pinyon Pine Nut Harvest is NOW!

Dear Reno Forager,

It is Pinyon Pine Nut harvest time right now. I just went out for the first time to figure it out. Here's the pertinent info you need to collect these delectables!


1. You don't have to go far. I found a big grove on Geiger Grade. Pinyon Pines are scrubby looking pine trees with small cones, often mostly at the top. I forgot to snap a picture of the trees when we were out, but here's some, courtesy of Google Images that look most like the trees we found on Geiger Grade:


2. Equipment needed:
  • Gloves (cheap, thick that you can throw away)
  • Hat & sunglasses (cover as much of your hair as you can, the bill/shades can help keep stuff from falling in your eyes)
  • large paper bags (disposable necessary, paper doesn't get stuck with sap as much as plastic)

3. When you get there, you'll find cones that are green and sticky, all closed. They're not ready. There's also cones that are open as pictured above, and here below in my own photos. We picked the open ones right off the tree (carefully so seeds don't all drop out). The difficulty is being able to GET the cones, since many are high up and out on spindly branches that you can't climb out on.


 The green cone is an example of one that is not ready with pine nuts. 
The others are the cones you are looking for!

4. Once you've lugged your treasure home, you'll need to deal with the sap all over you and your clothes. For your skin/hair, use oil. I rubbed all the sticky stuff off with olive oil spray and had no problems. I have read multiple different things about clothes, but can't tell you which is best from experience... but see the link for pitch removal at the end of this post.

5. Find a surface outside you can strike the pine cones against to release the seeds. They should be pretty loose already if they're open cones. You'll need those gloves for this, but pick up the seeds with bare hands so you don't get any sap on them if possible.

Here are some I cracked open. 
They're yellowish and shiny because I baked these ones.
They're whiter raw.


6. Eat 'em like sunflower seeds! (They're 'soft shell' pine nuts, so they're easily cracked with teeth, unlike many other pine nuts)
  • Raw, crack the shell with your teeth (did this!)
  • Soak them in salt water and then bake them at 400 in the oven for about 10 minutes, testing them and pulling them out when the milky white inside inside turns translucent. (didn't try this yet!)
  • Just lay them on a cookie sheet or pan and bake them at 400 in the oven for about 10 minutes, testing them and pulling them out when the milky white inside turns translucent. (did this! DELICIOUS!)
 I baked some in this dish at 400. I think they only took 9 minutes. They went fast! I pulled one out and cracked it to see if it was ready. Did that about 3 times before I felt like they were ready. Remember, they'll keep baking after you've pulled them out if you don't cool them immediately, so go for underdone, or cool them quick!
 My husband and I made short work of the pan I baked. Mmm!

7. Storing your pine nuts right makes them last longer. Because they have moisture, they need to NOT be in an airtight container unless you put them in the freezer. Raw, they'll last in a paper bag in a cool closet for a long time. Baked, you'll have less time to consume them before the oils turn rancid. If you collect a lot, the best bet is to freeze them and thaw only what you need to use at a time.

For more info on pinyon pine nuts & harvesting them, check out these websites:
Harvest is September and October, but they may be done early this year, so get out there! Collecting a bag of cones with a friend should take you less than an hour. Enjoy!

Sangrita! (What's That?)


The sangrita recipe I found, with two of our favorite 
cheap tequilas from Cazadores - their reposado and anejo.
 
We are tequila aficionados. We love tasting and sipping reposados and anejos wherever we go, and we have an ungodly collection at home that occupies multiple shelves.

Only twice before Monday had I ever had sangrita, however. It's the "palate cleanser" of tequila tastings. Apparently the recipes vary widely... I have no idea what the under-pinning theory of a sangrita is, or the non-negotiable ingredients. However, the last one I tasted was delicious and tasted almost like a pico-de-gallo salsa with strawberries, blended into a smoothie consistency. It wasn't gross. Think mango salsa... sweet, but there's onion and spice kick...

I looked it up and it is EASY. And man, does it make for a sophisticated tequila-tasting party. You gotta try it. If you have never hosted one, and don't know where to start -- grab Cazadores' reposado and anejo. They're relatively inexpensive and the best bang for your buck. Delicious.

When you're serving it, serve shots of tequila to taste, and then shots of the sangrita for sipping in between tequilas. Mmmm!

Here's the recipe I found. (assembles in about 90 seconds)

However, because I just can never leave anything alone, I modified it TWICE and made my two girlfriends and husband taste all three. The original was one gal's favorite, but the other three of us loved variation #1. Here ya go:

Variation #1.

Follow the directions for the original except:
- substitute 1 1/2 sliced/pitted peaches for the grenadine
- Puree it all in a blender to get it smooth

Variation #2.
- substitute 3 roma tomatoes for the tomato juice
- substitute 1 1/2 sliced/pitted peaches for the grenadine
- double the tobasco
- Puree it all in a blender

Interestingly, most of us loved the little peachy punch of Variation #1. The original recipe tastes a lot like a spicy bloody mary mix. You probably could use it, in fact ... just add vodka.

 Cheers!

Please tell me that you also destroy your kitchen like this with a simple 90-second recipe!


Emerald City Salad // My 2012 Version


Shortly before I got married, I had a rare afternoon free to spend with my aunt. We lived about five blocks from one another, and were both close to Greenlake, so we met up and walked the lake and then got lunch at PCC. That afternoon was a meal I will always remember because it was one of the only peaceful and lovely moments I can remember in the whirlwind of engagement. We ate the Emerald City Salad from the deli, and finished with wild blueberries and devonshire cream. The sunny day, the food, and the company were perfect. We both raved about the salad, and later after marriage, moving, etc., I recalled it and found it on the internet.

The real recipe is here.

I adapted it this summer, although I love the original recipe at least as much. I didn't have all the right ingredients, but wanted to make the salad just the same!

It's labor intensive, but because you're working with kale and chard for greens, it holds up for days in the fridge. You can eat it all week. And it's is crazy healthy and crazy delicious -- a rare combo.

It's hard to find straight wild rice and avoid mixes. If you don't want to go to the trouble of the hunt, use a wild rice mix. If you want to follow directions perfectly, last time I checked Trader Joe's has a 100% wild rice bag.

My Version

1 c. wild rice
1/3 c. olive oil
1/2 c. fresh lemon juice
salt, pepper & minced garlic to taste
2 ears raw sweet corn, slice kernals off
1/2 regular swiss chard bunch, spine removed and chopped
1/2 red swiss chard bunch, spine removed and chopped
1 fennel bulb, sliced thinly & chopped
1/2 bunch italian flat-leaf parsely
1 red bell pepper, chopped
bunch of chives

Follow the same directions as PCC: make the dressing from olive oil, lemon juice, salt & pepper and garlic. Cook wild rice with 3 c. water, allowing it to burst open (this takes awhile, so start cooking it early). Toss all ingredients together. It's best if you can let it soak for 4-6 hours before eating it, but you can serve it immediately if you'd rather. I like it best the 2nd day.


Monday, June 25, 2012

Popcorn + Herbs + Salt + Sugar = Addiction

In my last post, I delivered my full arsenal of spice mixes, my favorite kitchen weapons of mass seasoning. I forgot about how much I love them for POPCORN too.

I love making stove-top popcorn because it is
1. A simple process and you don't have to own or store any bulky equipment
2. Speedy to make
3. Require minimal dishes and is a fast clean-up
4. HELLA CHEAP
5. HELLA LOW-CAL
6. HELLA TASTY

You need:
A) popcorn kernels
B) Pan w/ a lid and capacity for 12+ cups
C) oil - preferably high-heat, like coconut or vegetable oil (olive will burn)
D) vegetable oil cooking spray
E) popcorn salt (it's the super-fine powdered salt. Otherwise, regular salt)
F) spices*

The bag of popcorn will have instructions on it, but you essentially heat up about 3 TBSP of oil in the pan SUPER SUPER hot, test 3 kernels in there, and when they all have popped, you can add 1/3 c. of kernels and start shaking the pan with the lid on, waiting for it to go nuts. When the popping dies down, turn it off.

After you've gotten your big fluffy pan of popped corn, you can spray it with the cooking spray (keeps the calories down and makes the salt/spices stick). Then salt/season to taste!

* Highly recommended seasonings:

1. If you live near Ballard, WA, just go to The Ballard Market and buy their house-made smoky rub. It's phenomenal. I have it in my cupboard. I finally saw they had an ingredients list and will try at some point to re-create it but I don't know the quantities and ratios. Here's the pic I took of the ingredients on the bulk-foods bin it came out of:
Ground cumin, onion granules, kosher salt, smoked paprika, ancho chili pepper (ground), granulated sugar, brown sugar.

I've decided it's the sugar, salt and heat that really makes this stuff so ridiculously addictive. Took it to a party as the poorman's contribution and it was a surprise smash hit. Everyone loves it. I can't stop eating it.

Other combos I love:
1. Using my spice rubs. Watch out, if you have one with too much pepper, it will make you start coughing like crazy because the cayenne gets in your lungs.
2. Fresh herbs and salt ... simple : thyme and salt, maybe with lemon zest.
3. Buying a spice rub in town.
4. Old fashioned salt.

Happy popping!

Thursday, June 14, 2012

Spice Mixes: The Speediest Way to Make Simple Proteins and Veggies Delicious


Several years ago, I fibbed my way into a job as a personal chef for two bachelors who wanted to eat a specific high-protein, low-fat / low-carb diet. It involved a kitchen scale and careful measuring. My limitations were such that monotony posed an immediate threat, but I was determined to keep things interesting.

Having convinced said bachelors of my culinary abilities through a confident demeanor fabricated in a way only those desperate to pay rent would understand, I secured the job... and then ran, terrified, to the library to rent all the cook books off the shelf.

This is the one that saved my life. I have been making Linda and Katherine's spice blends ever since, and hardly a day goes by when I don't use them. I used them for that job (and got a lot of compliments once I mastered not overcooking the meat), I used them for myself later, and put them in cute jars for Christmas and birthday gifts, and now I use them on my husband's eggs in the morning, in our spaghetti sauce, and on veggies for the barbecue. These spice rubs are our salt & pepper
and then some.

So here are my favs from the book, in order of
my preference. Also, screw the suggested uses listed below: these guys are so versatile and delicious they go on anything. My favorite is the Bourbon Street, husband's favorite is the Chipotle, doctor friend's favorite is the Texas Big Flavor, and another friend's favorite is the Scarborough.

Also, word of the wise. Just make all of them at the same time. It will take forever to do the math and purchase all the right amounts of spices in bulk, but if you do them all at once, you'll be set for at least 6 months and be able to share with friends.


Bourbon Street Spice Blend
The High Protein Cookbook by Linda West Eckhardt
This goes on: pork, chicken, shrimp & crab. Makes 1/2 cup of rub.

2 Tblsp. Paprika
1 Tblsp. Cayenne
1 Tblsp. Dry Mustard
2 tsp. salt
2 tsp. freshly milled black pepper
2 tsp. garlic powder
2 tsp. ground sage
1 tsp. white pepper
1 tsp. onion powder
1 tsp. ground cumin
1 tsp. dried thyme
1 tsp. dried oregano

Mix & store in airtight container.

Taos Mountain Chipotle Rub
The High Protein Cookbook by Linda West Eckhardt
Especially good on: Chicken, veal, pork, beef, roasted corn, cucumbers. Makes 1 cup.

5 dried chipotle chiles
5 dried ancho chiles
1/2 c. garlic powder
1/4 c. dry oregano
2 Tblsp. Salt

Blenderize ingredients together. Store in airtight container.

Texas Big Flavor
The High Protein Cookbook by Linda West Eckhardt
Good with: BEEF, chicken, pork, salmon. Makes 1 cup.

1/4 c. salt
1/4 c. paprika
1/4 c. chili powder
3 Tblsp. Fresh black pepper
2 Tblsp. Garlic powder
1 Tblsp. Cumin
2 tsp. cayenne

Mix pre-run on meat that will be further sauced.

Scarborough Fair
The High Protein Cookbook by Linda West Eckhardt
Good for: fish, fowl, pork , beef, creamed veggies (ie cauliflower). 3/4 cup.


1/4 c. onion powder
1/4 c. paprika
1 Tblsp. black pepper
1/2 tsp. cayenne
1 Tblsp. dry parsley
1 Tblsp. sage
1 Tblsp. crumbled dry rosemary
1 Tblsp. dried thyme
Mix & store in airtight container.

Louisiana Swampland Dry Rub
The High Protein Cookbook by Linda West Eckhardt
Good with: chicken, pork, shrimp, crab. Makes 1/2 c. rub

2 Tblsp. Garlic powder
2 Tblsp. Paprika
2 Tblsp. Dried oregano
2 Tblsp. Dried thyme
1 Tblsp. Freshly milled black pepper
1 Tblsp. Onion powder
1 tsp. cayenne (or more!)
1 tsp. salt

Mix & store in airtight container

Basic Jerk Seasoning
The High Protein Cookbook, by Linda West Eckhardt
For: chicken, pork and beef. Makes 1/2 c. of rub.

1 Tblsp. Onion powder
1 Tblsp. Ground allspice
1 Tblsp. Freshly milled black pepper
1 Tblsp. Cayenne
1 Tblsp. Garlic powder
1 tsp. dried thyme
1 tsp. ground cinnamon
1/2 tsp. habanero chile powder
1/2 tsp ground nutmeg
2 bay leaves
1 Tblsp. Salt
1 tsp. sugar

Mix & store in airtight container.

Monday, June 4, 2012

Northern Nevada Wild Edibles

This is just a research page for personal use. I'm trying to figure out what our native edible botanicals are.

Here is a page on applying for commercial use of pinion pine nuts.

Then there is a thread on plants in our area (potentially). It includes book recommendations for more info.

Additionally here is a page on the "best field guides to edible plants."

That's all I got for now! Maybe I need to see if the Moana Nursery has a botanist or someone who can help me with identification.


Tuesday, March 6, 2012

Poppyseed Dressing

This is, hands down, our favorite salad.

My Aunt Susan is a woman who always brings celebration, excitement and laughter with her wherever she goes. Her voice always brings brightness of a happy Broadway actor announcing glad tidings from the edge of the stage to the furthest seat in the balcony. And she always brought this salad in a giant stainless steel bowl to Thanksgiving and Christmas get-togethers with the family. So when I see this salad, I hear her voice and see her curly hair bouncing with her laugh.

In a blender or jar, mix:

1/3 c. cider vinegar
¼ c. sugar
1 tsp. dried mustard
1 tsp. chopped red onion

While blending slowly, add

¾ c. vegetable oil (or alternative: ½ c. chicken stock)

Stir in:

1 – 2 tsp. poppy seeds

Pour over romaine, red onion, feta, pecans and canned mandarin orange slices.