Friday, December 13, 2013

Marshmallows with "Better Sugar": Agave and Organic Cane Sugar

I'm kind of shocked that it worked. There are a few notable differences in the creation, but otherwise this recipe is essentially an ingredient "swap out" equivalent to the classic marshmallow recipe I have posted here (and is from Alton Brown, mildly adapted all over the internet).

So, substitute in the classic recipe, cup-for-cup: Agave syrup (replaces corn syrup), and organic cane sugar (granulated to the same fineness as regular granulated sugar). And, instead of using powdered sugar for dusting, you blenderize some of that organic cane sugar with cornstarch to make your own.

Here's what I found:

1. I used "Wholesome Sweeteners Organic Blue Agave nectar" in "light" version.
2. I bought my organic cane sugar in bulk from WinCo and it had some hard chunks in it -- so I measured out what I needed with the smallest size of chunks so that it wouldn't cause problems dissolving in the candy concoction.
3. MAJOR DIFFERENCE #1: My candy foamed like CRAZY. Like, I wished I had put it in a giant pot so that I didn't have to keep taking it off the heat. It was slightly stressful and took about 10 minutes of careful handling putting it on and taking it off and stirring like crazy to keep it from boiling over while trying to get it to 240. I barely got it there, so I don't know if that factors into the next discovery.
4. MAJOR DIFFERENCE #2: Not only is the liquid candy a lot darker, it's a lot less viscous -- runny, thin, almost watery. I was worried it would not set at all when I put it in the KitchenAid with the gelatin/water combo. In fact it was so runny that it was spitting sugar everywhere. I put a towel over my KitchenAid for the first 5 minutes of whipping until it had gained enough substance to not spit hot candy drops all over.
5. MAJOR DIFFERENCE #3: It tastes almost sickeningly sweet if you taste it before it sets. Oddly, this over-sweetness seemed to diminish by the time I cut them -- and they tasted normal to me.
6. MAJOR DIFFERENCE #4: The finished product is so soft and spongy, I waited 2 days (in very dry climate) to pop them out of their tray and slice them into individual mallows. They did hold, but they are very soft.
7. NOT-SO-MAJOR DIFFERENCE #5: You can definitely taste some of the darker tones of the agave that somewhat mask the vanilla bean. Not a lot. Just a bit. And the marshmallows are more off-white in color.

There ya have it! If you want to make unrefined sugar marshmallows, it's actually quite straightforward and doable!

Monday, July 29, 2013

Pine Nut Brittle


I love pine nuts. And, years ago, at an engagement party for a friend, I had dinner at an Italian restaurant in Berkeley. One of their dessert options was a cheese plate with various pairings including quince jelly and a walnut brittle with rosemary in it. I had never heard of making a brittle with anything besides peanuts, much less adding savory herbs! With soft and sour goat cheese, it was an amazing pairing. Thought about it ever since.

Since moving to Nevada, I have been curious about native edibles. In the Great Basin, though, pickings are pretty slim. It is so dry and the weather is so extreme.

But we have pinyon pines. And I have written about them before. They make arguably the best pine nuts ever.

And I decided to make pine nut brittle, with green tips of fresh pine for an herbal additive. Turned out amazing.

I stole the peanut brittle recipe from here and then swapped out the peanuts and added fresh green tips. It's too late to add them now, but my next batch I will probably try rosemary again as it has a piney fresh taste as well. Try making a batch and serving it with soft, crumbly goat cheese at a party! YUM!

Pine Nut Brittle
Candy thermometer required!
 
1 c. sugar
1/2 c. light corn syrup
1/4 tsp. salt
1/4 c. water
1 c. pine nuts (yes, it is expensive! sorry!)
2 Tblsp. softened butter
1 tsp. baking soda
2-3 Tblsp. fresh, bright green pine tips (springtime only!) or another herb such as rosemary. (or 1 tsp. of a ground spice, like allspice or rubbed sage.)

1. You will need a greased cookie sheet -- might as well Pam a sheet at the beginning and set it aside. Also, you will need your teaspoon of baking soda measured and read, as well as the butter ready to go.
2. In a small sauce pan, add sugar, corn syrup, salt and water. Turn the heat on to high, and stir to dissolve the sugar.
3. Once the sugar has dissolved, add the pine nuts and clip the candy thermometer in place to watch the temp.
4. Stir frequently or the nuts will burn and the candy will as well in spots. Once you reach 300 degrees F (hard crack stage), remove from heat immediately.
5. Add the butter, soda, and pine tips (or other herbs) and stir quickly -- the soda will make the candy foam up.
6. As soon as everything has been stirred in well, pour the candy onto the cookie sheet. Allow it to set. If you are in a warm place, you may need to place it in the fridge.
7. Once the candy is hard, it is easy to snap chunks off the pan. Delicious!


Caution: if you live in a warm place or are experiencing the heat of summer, you may need to keep the candy in the fridge. I made a batch that started melting and getting to a consistency that was about to pull peoples' teeth out, rather than crunching and crumbling. Once I put the remaining candy in the fridge, it firmed up right and was much more edible.

Thursday, April 18, 2013

Favorite Food: Maharagwe -- Kenyan Curry

Jambo, my friends!

The truth is I have never been to Kenya, so I have no idea if this recipe is any more Kenyan than French Fries are French. But I don't really care. My love for it is secure no matter where it is from or what it is called, it is so good.

This is, really, my "mac 'n cheese," comfort food. It is really easy to make; vegan; cheap; and for being so simple in the spice department, it is uncannily addictive.

I think it almost takes longer to cook the rice that accompanies than to make the dish.

I apologize that my food photos are not incredible.* It's a point-and-shoot, I have a bit of a superiority complex over food photography (so mainstream), and I'm in a rush to get this up for a friend. But at least you will be able to see if yours looks remotely as it should!

Recipe for Maharagwe (Kenyan Curry)

2 Tblsp. oil (I use olive or coconut)
1-2 onions, chopped (I use 2)
3 cloves garlic, minced
1 tsp. turmeric
1/2+ tsp. cayenne pepper
1 28-oz. can of diced tomatoes, OR 3-4 fresh tomatoes, chopped
2 15-oz. cans of dark, low-sodium kidney beans, drained & rinsed
2 15-oz. cans of lite coconut milk (I have a strong preference for the lite; if you have strong feelings otherwise, try it your way but don't complain to me if it's too rich :) )
Salt to taste

1.) Heat oil in a deep skillet. Saute the onion past 'golden' to the point where the edges almost look like they are burning. 
2.) Add minced garlic and stir for about 30-60 seconds.
3.) Add tomatoes, turmeric and cayenne, stir to combine everything. [Be careful to not let the cayenne saute without the tomatoes for more than a few seconds or you may get the pepper in the air and effectively pepper-spray yourself. I've done it more than once!]
4.) Add kidney beans; stir. 
5.) Once the mixture is boiling, pour in the cans of coconut milk, stir, and turn off the heat.
6.) Test and add as much salt as you'd like. If you need more cayenne, you can add this, too.

Serve hot over rice -- the best is a sushi-style, sticky, pearl or short-grain rice.

I know that nothing about this recipe or the photos is all that glamorous or "grabbing" -- but I'm serious, it is my favorite food. And you can serve it at a party without breaking the bank and it's a protein-packed pleaser for vegans, vegetarians, and educated carnivores alike. Enjoy!

* Full disclosure: I just zapped this in the microwave from days ago, and the rice was mixed in so that is why it's all yellow and incorporated, rather than the curry sitting atop the rice as I usually serve it the first night. But 3 days later with a quick zap in the microwave and it tastes maybe even better than the first night.

Monday, December 31, 2012

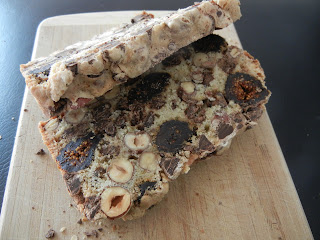
Ode to Theo Chocolate: Fig, Fennel, Hazelnut and Chocolate Fruitcake


Once upon a time, I lived in Seattle, home of Theo Chocolate, the bean-to-bar chocolate factory in the Fremont neighborhood. Theo is the creator of some cheerfully offbeat chocolate bars, including mirepoix caramels and the delicious Coconut Curry chocolate bar.

But, in my mind, nothing competes with their Fig, Fennel and Almond bar. All alone, it is interesting to nibble at. Throw it in the mix at a wine-tasting, however, and this chameleon steals the show. I have never had a piece of chocolate so overtly recreate itself depending on the wine it is paired with. With one red, it tasted dark and bitter; with another it was absolutely jammy and all you could taste was figgy chocolate. Another tasted very grown up and sophisticated - smoked fennel with a tinge of syrupy sweetness. With every sip of a different wine, the same chocolate sang a new song. For that kind of a magic trick, it became my favorite.

At Christmas time in my family, we always make Maranatha Cake... a secret recipe from my Dad and the men on his side of the family. My brother makes it, and I am sure he's been teaching his son to make it as well. I think I am the only woman in the family who makes it as well.
This is one of my brother's photos -- the original cake in full-loaf

Technically, it's a fruit cake. But I hate calling it that, because it is more like a candy bar baked into a loaf form. There is very little "cake" -- just enough to hold the chocolate, fruit and nuts together. It isn't doused in alcohol, it has no citrus or (much worse) citron or green pineapple in it.

The published variation includes apricots and white chocolate.

The original recipe is a guarded secret, but my father published a variation recipe in a paper several years ago. Since the variation is out there, I figure I am safe to share my variation on our family recipe.

This one is a tribute to Theo's Fig, Fennel & Almond bar.


I attempted this last year with figs, fennel bulb, almonds and semi-sweet chocolate. It was extremely disappointing as I discovered fennel bulb retains little to no flavor once it is cooked/dried out. So I had chocolate fig bars. Dumb.

This year, I wised-up, and got fennel seed. Also, because I really am just tired of almonds, and I have always loved hazelnuts since I was a small child and related emotionally with them as the puny round underdogs amidst big personalities in the mixed nuts bowl... I decided to substitute hazelnuts for almonds.

The results, I think, were incredible. If you don't like any of the dried fruit/nut ingredients, just substitute your own in the same quantity.

Preheat oven to 325.

You'll need 2 bowls, parchment paper, a regular sized loaf pan and a few other regular items.

In a bowl, beat together until pale yellow:
- 3 eggs
- 1 c. sugar

In a separate bowl, sift together:
- 1 1/2 c. flour
- 1 1/2 teaspoons baking powder
- 1/2 teaspoon salt
- 2 Tablespoons fennel seed

Then add to flour mixture:
- 1 bag (usually 11-12 oz) semi-sweet chocolate chips, or about 1.5 cups
- 2 cups dried black figs
- 2 cups raw hazelnuts

Stir the dry ingredients together to make sure all the fruit, chocolate and nuts are separated and coated in the flour mixture. Pour in the egg/sugar mixture, and mix everything until all the flour is absorbed and you have a very chunky batter. Press it all into a no-stick sprayed, parchment paper lined loaf pan. [if you don't use paper to lift the loaf out, you will be sorry!] Bake for 60-75 minutes, or until a toothpick comes out clean or with only melted chocolate (not batter) on it!

Hint: It will make your cake much more moist if you put a pan of water in the oven on a lower rack while you bake the loaf of maranatha cake.

Once it has cooled, lift it out of its pan and wrap in plastic wrap and foil to keep. This will last for a very long time in your fridge and is great to pull out throughout the holidays to slice off a wedge at a time. We cut our about 1/2" to 1" thick, and usually can only handle a half-slice at a time.

Friday, November 30, 2012

Vanilla Bean Marshmallows

(this has a lot to it, so if you just want the recipe, skip down)

Several years ago, I learned to run using a walk-jog 13-week 10K program. As a girl who had always tried to hide in a closet with a book whenever her mother mentioned the word "outside," and who could never sprint further than the distance between two telephone poles... this was nothing short of a miracle to me. I'd accepted and embraced the "unathletic" label, and just assumed that is how it would always be. So to learn to run changed my life. I learned to do something impossible. It was overwhelming and spilled confidence into many other areas of my life ... and I started tackling the impossible everywhere.

I wanted to share this joy and offered to be a running buddy / coach to anyone who wanted to commit to do it. I was loosely friends with D at the time, but she took me up on my offer. While others would pull no-shows and frustrate me, D would show up, day after day, week after week. She also never considered herself athletic and had her own childhood issues with P.E. She had more discipline than I did, and was always on time, ready to meed me. And she DID it. She learned to run. She also tackled the impossible and came out victorious. I was so proud of and happy for her. We continued to jog and walk together every week for years.

In the midst of forming this long, slow-cooker, deeply enjoyable friendship, D showed me how to make marshmallows. I may have been a few steps ahead of D in the running world, but she was a bold explorer into the culinary ... and she was making candy!

Candy has always intimidated me: thermometers, exact timing, burning sugar... I mean, you look away for ten seconds and your caramel sauce turns into jawbreakers. Or something like that.

D took the fear out of candy for me by inviting me to make marshmallows with her. I think the first time we made them, it was Christmas time, like now. She lived near a neighborhood that competed for highest electric bill in December, and their lights and yard decor for Christmas were incredible. So we hatched an idea... to make marshmallows, and put them in spiked hot chocolate for a tromp in the Christmas lighted neighborhood. (Not only was D a seasoned culinary experimenter, she also was an intrepid cocktails-and-liquors explorer... and I owe my love of tequila to her and her husband.)

Needless to say, it was a smash success that we repeated. While what I treasure most is the memory and friendship, I have to say the marshmallows are the crown on the experience.

I moved, and D and I no longer have our weekly walks. I live nowhere nearby to do Christmas and marshmallows.

I did bring the recipe with me, however, and her legacy lives on in my current regime.

These vanilla marshmallows, it turns out, are the Achilles Heel of my husband's perfect healthy eating lifestyle and self-discipline. While he will say 'no thanks' to any dessert or unhealthy food, even if it means not eating for days... he has a weakness for these marshmallows in Mexican Hot Chocolate and specially requests it.

As a sugar addict desperate for company on a sugar-binge, of course I oblige him. I love it.

Cheers to you, D! Thank you for the hundreds of runs and walks over the years. Thank you for chili and jalapeno cornbread, thank you for all the post-walk cocktails, thank you for the olive oil cake, thank you for good talks, thank you for showing me Cake Wrecks and Simon the Cat, and thank you for teaching me to make marshmallows! Merry Christmas to you and your little family! I hope you get to drink lots of hot chocolate and enjoy Christmas lights all through the season.

Stephan's Achilles Heel:

- Ibarra hot chocolate (yellow octagonal box in the Mexican food section usually. "Abuelita" also works great)
- organic nonfat milk (hey, it helps him feel better. If you want to go for whole or 2%, do it!)
- vanilla bean marshmallows (recipe after this)

1. Measure milk in cups (2 c. per person). Pour into a sauce pan on the stove, and put the heat on medium or high.
2. For each cup of milk, use a square of chocolate. So, for Stephan and I, we make 4 c. milk, and put 4 wedges (half a round) of chocolate in the pan.
3. Let it warm up enough that the chocolate gets soft ... and whisk it into the milk.
4. Pull it off the burner when it is as hot as you want it. If you boil it, it will get a skin (no biggie).
5. Add marshmallows!

If you want... spike it. With brandy, or tequila, or bourbon/whiskey, or whatever else you think would be good. I liked it with Tullamore DEW, the whiskey used in Irish Coffees.

Vanilla Bean Marshmallows (adapted from Alton Brown's Food Network recipe)

STOP! You must have a Kitchen Aid and a candy thermometer. If you don't have these, I don't now how you can do it. You miiiight be able to do it with an eggbeater rather than Kitchen Aid. Be prepared, it will be a lot of work if you do.

1 c. light corn syrup
1 c. ice-cold water
3 packages plain gelatin (Jello aisle; Knox makes it and the smallest is a box with 4 packs)
1 1/2 c. regular granulated sugar
1 tsp. kosher salt
1 vanilla bean (if you can't spring for it, 1 tsp. extract)
1/4 c. powdered sugar
1/4 c. corn starch
nonstick spray (no flavor)

1. Put 1/2 c. ice cold water in the Kitchen Aid. Sprinkle the gelatin on top. Leave it to sit.
2. Into a saucepan put the granulated sugar, salt, corn syrup and 1/2 c. water. Turn it on HIGH, and don't stir it. Leave the lid off. Clip the candy thermometer on and make sure you can tell where 240 F is (also labeled "soft ball" for the candy terminology). It will take 7-8 minutes to get there.
3. While you are waiting, mix powdered sugar and cornstarch. This is your "no stick dusting powder" for the marshmallows.
4. Once the sugar syrup hits 240 F, take it off the heat immediately.
5. Turn on the Kitchen Aid (SLOW) and drizzle the hot syrup down the side, slowly incorporating it into the gelatin mixture.
6. Once all the syrup is in, turn the speed up to its highest setting and set your timer for 15 minutes.
7. Cut open and scrape the vanilla bean for its guts and add it to the marshmallow mixture about 5-6 minutes into its timing. If you do it too early, the mixture is so hot it will cook out some of the flavor. If you wait too long, it doesn't mix in very well.
8. While you are waiting, spray a 9x13 cake pan or similar dish (eg casserole, something with some depth) with the nonstick spray, and then dust with the powdered sugar / cornstarch mixture. It's messy...
9. Once the Kitchen Aid beating is done, it should look really amazing - like marshmallow fluff. The bowl should feel warm to the touch, but not hot.
9. Spray a rubber spatula with nonstick spray, and use it to scrape the marshmallow out of the Kitchen Aid bowl into the dish. Smooth the surface as necessary, but it looks good with a rustic, non-even surface, too, so don't stress.
10. Leave the tray uncovered in a dry place where it won't get dust for several hours (depending on how dry it is where you live, this could be faster or slower) -- 4 at least, overnight at longest. Once it has set, it will be one giant marshmallow that you can pull out of the dish in its entirety. a knife with non-stick spray and powdered sugar/cornstarch can be used to cut marshmallow squares at whatever size you prefer. Roll the stick sides in more of the powder.
11. Store in an air-tight container and I think they last forever. Not that they'll last nearly that long.

YUM!


Thursday, November 29, 2012

Orange Slice Ornaments

 
Last year, I stumbled across some instructions on the easiest impatient-person-friendly ornaments ever. And they're so pretty. For my ADD, this project worked GREAT. All you need is citrus and a sharp knife, a baking sheet and an oven.

OK, so there are LOTS of instructions for how to make these out there on the internets/Pinterest, etc. But a lot of them make this more difficult and crafty ("add cinnamon! sprinkle with sugar! sprinkle with glitter!" and a bunch of complicating crap like that). Ignore them and do it the easy way and it's simpler and more elegant in my opinion.

Here's what I remember:

1. slice oranges across the sections (so they look like wheels), into 1/4" to 1/2" rounds. The thinner they are, the clearer they'll be... but you also run the risk of them tearing or getting holes.

2. Place rounds on a cookie sheet and bake at some low temperature for hours until they are dry as toast! (you probably have to turn them once to finish them off). Try 150 degrees for 3-4 hours, see how it works. Just don't turn the oven up too high or it will make them burn and turn dark.

3. THE END. Oh, get some thread and needle, and thread a loop through the orange to make it hang-able on the Christmas tree.

4. Bonus: your house smells amazing while these suckers are in the oven.

Here's my pics from last year:

 (pay no attention to the fennel on the bottom left)
 Plateful of the Martha Stewart worthy ones. Yes, you've already seen this. Yes, I'm proud of myself.
 Reality check: they don't all come out perfect. But I still like these. And if I do it again, I'll use THESE in apple cider mulling spice mix.
 See how clear they can get? Well, the lemon slices got really clear for me.
They look so pretty on the tree. The end!

Wednesday, September 12, 2012

Adventures in Sangria

I tested a lot of white or pink sangrias this summer. I'm sharing photos from my prettiest and unfortunately least-rewarding endeavor*... a Caliente Sangria, with jalepeno to spice things up!

*My mistake was using unripe fruit. 
Everything was sour and hard, not luscious and soft! 
Also, I just don't prefer pepper in my sangria, I guess!

As you can see, white sangria is absolutely gorgeous and showcases the fruit better than a red sangria. I honestly think they taste better and are more refreshing, too. Nothing beats a cold glass of white or pink sangria under a porch umbrella on a hot day!

I also think I've boiled down the basics to put together a GREAT white or pink sangria every time. Here's the formula... you should experiment with one!

1. One bottle of Sauvignon Blanc or Rose. My favorite is, honestly Barefoot. It's delicious. You want something that is fairly dry, and not too expensive.
2. One bottle of champagne, prosecco, or cava -- again not to expensive, but not one you think is disgusting on its own. I actually find most proseccos or cavas are better tasting. Just my experience. You need bubbles.
3. Three kinds of RIPE fruit, 1 cup each. Good ones include: peaches, nectarines, grapes, cherries, apples... think stone fruits and things you often taste hints of in wine. Strawberries and other tender fruits may work, too, but realize they're delicate and will fall apart faster. If you use underripe fruit, your sangria will hardly be flavored at all, and will be forgettable.
4. Two shots of one or two kinds of hard liquor that pairs well. For example, peach schnapps with peaches and nectarines. Pear brandy with apples and lemons. Think what flavors you would like to taste together.
5. Sweetener. If your liquor has sugar in it (like peach schnapps, or limoncello) you may not need any sweetener. If you're using tequila or brandy or something that is not pumped with sugar, you'll need to add a few tablespoons of honey or agave or dissolved sugar.
6. Extra: add an herb if you'd like! Basil, mint, thyme, etc. Get creative!


Assembly:

1. Slice fruit into bite-size chunks, and place in bottom of sangria pitcher. (Add herbs if you're using them.)
2. Pour hard alcohol and sweetener over the fruit. Stir and allow to macerate for at least an hour.
3. Add white wine or rose, but don't stir. Steep 6 hours or overnight, covered.
4. Just before serving, add bubbly.
5. Pour over glasses filled with ice.

DELISHUS!!!